1. With This Recipe, You Can Now Produce Paneer Without Using Milk.
Love paneer but can't eat it because you're lactose intolerant? Have you gone vegan and are looking for an alternative for paneer? Here's a DIY recipe for paneer that uses only three simple household ingredients: peanuts, vinegar, and water. This Peanut Paneer has the same texture and flavour as store-bought paneer. Peanut Paneer may be used to produce a range of meals, including appetisers, main courses, and desserts.
2.Soak And Crush The Peanuts
Put 2 cups of peanuts in a dish and wash them once. Fill the basin halfway with warm water and soak the peanuts for 1 hour. Remove the peanuts from the water and place them in a blender. Add 14 cup of water and mix until a thick paste forms. If you have a tiny blender, you may blend in batches, but make sure the peanuts are well smashed and transformed into a paste.
3.Make Some Peanut Milk.
Pour 1 litre of water into a saucepan with the peanut paste. Mix over medium heat until the paste is well combined with the water. You don't need to boil the peanut milk; simply turn off the heat after 2-3 minutes of constant stirring. Pour the milk through a strainer that has been lined with a cloth. Make a potli and squeeze out all of the milk. Put the peanut milk in a saucepan and set it aside. In the potli, you will receive peanut pulp, which may be used to create halwa, barfi, and other desserts.
4.Make The Milk Curdle
Set the peanut milk pot on medium heat. Meanwhile, dilute 1 tablespoon white vinegar with 4 teaspoons water. When the milk begins to boil, turn off the heat. Now, add half of the diluted vinegar and mix constantly. When the milk begins to curdle, add the remaining vinegar mixture to the saucepan and stir constantly. Gently whisk the mixture until all of the chenna separates and a watery liquid remains.
5.Straining Process
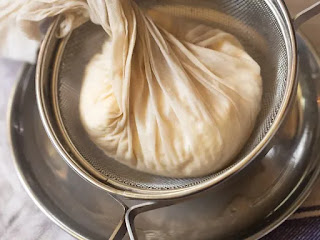
If you leave the chenna in the vinegar mixture for too long, it will become sour. So, once all of the chenna has separated, we'll strain it fast. Take a big strainer/sieve and line it with a muslin cloth for the straining procedure. Pour the chenna mixture through it to remove any excess water. To get rid of the vinegar smell, pour 2-3 glasses of cold water over the paneer.
6.Placing the Paneer
Make a potli out of the muslin fabric and squeeze out all the excess water. Place the potli on a dish and top it with something hefty. This will assist the paneer in achieving a property form. Allow it to sit for 1 hour. If you keep the paneer like this for more than an hour, it will become too dry.
7.Ready for Usage
Your milk-free Paneer is now ready to use. You may use it to create Sabzi, Curry, Sandwiches, Wraps, and even chenna-based desserts like Rasgulla and Rasmalai. Fill a basin with water and dip the paneer in it before storing it in the fridge. This paneer may be kept in the refrigerator for two days.


